Vista - Win7 Info
The following was captured from
Windows 7 Forums.
Parts were altered to fit our needs... and possibly yours.
If you are on a single computer, the Public profile makes more sense, since it's more secure.
-But- it may block to much.
The difference between Work and Home is a little harder to explain...
A "Home" network is useable only by an all Windows 7 network.
XP, Linux or Mac mixed in will cause all kinds of screwiness. It is basically an Open network, joined by a
single password and supports media sharing, network cataloguing and several other
useless new features.
A "Work" network is XP style file sharing where you use usernames
and passwords to connect to other computers. Sharing is controlled by user account and share permissions that
can be made very safe. When you have mixed OSs at play, this is the only networking that's going to behave
properly for you.
For Mac, or Linux compatible sharing, you need to set the OS itself to a do
Windows Compatible Networking
... the Worgroup name has to be the same on all computers
(XP didn't seem to care about this but Windows 7 does...)
(Not exactly true. The XP systems
that I have dealt with did care.)
After setting to "Work" Network... In Windows 7 set the following:
 |
Click on the StartOrb |
 |
Select Control Panel |
 |
Select Network and Internet |
 |
Select Network and Sharing |
 |
Advanced sharing options |
|
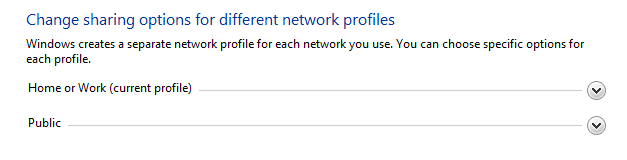
We are selecting the Work or Home Profile |
|
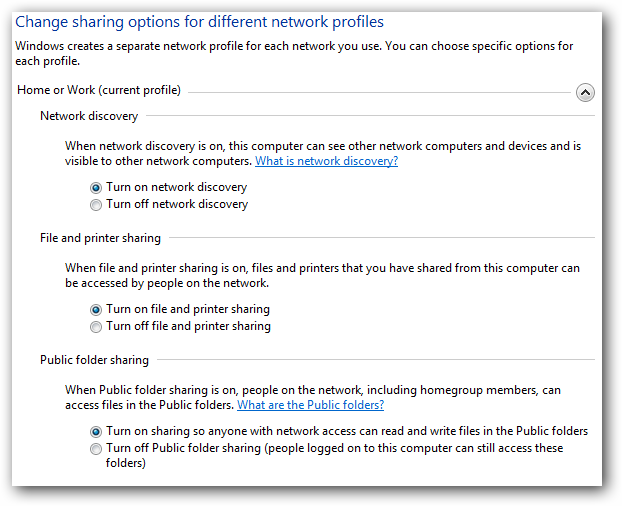
Work or Home settings |
|
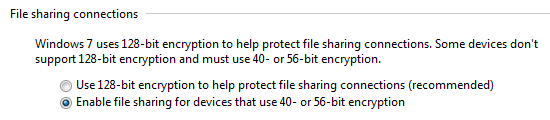
Set File Sharing Connections to 40 bits encryption. |
|
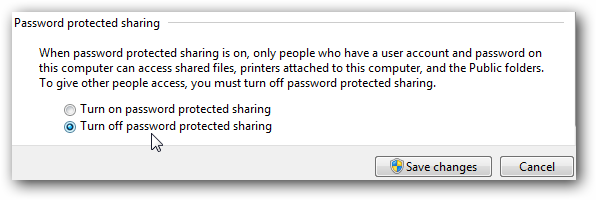
Turn Password Protected Sharing OFF |
|
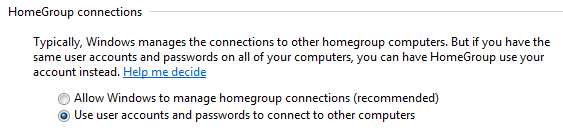
Enable User Accounts and Passwords for sharing |
| Save changes You will then be notified that you must log off your computer to apply these changes... do it. Then log back on. |
|
In Control Panel -> Appearance and Personalization
In Folder Options -> View
Turn off Use Sharing Wizard
Click Apply
Click Ok
In Control Panel-> System and Security > Administrative Tools -> Services
Set Computer Browser to Manual
Set Homegroup Listener to Manual (Disable if it starts)
Set Homegroup Provider to Manual (Disable if it starts)
Set SSDP discovery to Automatic.
In Control Panel -> Network and Internet -> Network and Sharing Center -> Change Adaptor Settings -> Local area (or Wireless) Connection -> Click Properties
Uncheck Internet Protocol V6... in both wired and wireless.
Reboot your computer.
Then once you make your shares... you should be all set.
End Windows 7 forum capture.
To change the name of the username:
go to settings->user accounts-> pick the adminstrator account(the first account)-> change its name
and its finish
Run regedit
Then go to:
HKEY_LOCAL_MACHINE\SOFTWARE\Microsoft\Windows NT\CurrentVersion
change:
RegisteredOwner and RegisteredOrganization
While Jennifer’s tip does change the _owner_ name (I tried it on my computer) it does NOT change the name of the root user folder, which is what I think we all really want to change.
If you used a bad name when first setting up your computer, or if you bought a floor model, or used machine, changing the owner name in the registry does not change the name of the default user folder. If you go to C:\Users you will still see the folder with the original name.
It is not a good idea to change the name of this folder, because various registry keys, and programs installed, will be looking for it.
It looks like the only way so far to change the name of your root/default user folder is to create a new user, move all your files, and get rid of the old one.
======================================================================
- Back up all your data (if necessary)
- Create a new user (Control panel, User Accounts, Create New User)
- Set that new user to be an administrator.
- Restart your pc and log in as the new user
- Transfer all your files to new account (if necessary)
- Switch users, log into old account, double check that you have copied over all your files.
- Log off old account and delete when it is no longer needed.
======================================================================
Run Regedit:
HKEY_CURRENT_USER\VOLATILE ENVIRONMENT
If you click on it you will see a list on your right, such as username, where you can see the name that you are getting in the value column, change this to your desired username. Hope this helps
======================================================================
I have also had this problem, the solution I found was;
1. Log into a separate Administrator Account, (You may have to enable the default Admin account) open Computer, Navigate to the Users folder, right-click the profile folder to change, and rename it.
2. Next, open regedit, and navigate to the registry key:
HKEY_LOCAL_MACHINE\SOFTWARE\MICROSOFT\WINDOWS NT\CurrentVersion\ProfileList
3. When you expand that, you will see folders with numbers after them. These are the Security Identifiers. Click on each of the SIDs and look at the string that says:
ProfileImagePath
until you see the one that matches the profile you want to change.
4. Double-click on “ProfileImagePath” and set the value to the new name you just changed in the Users folder.
5. Restart the computer. Don’t forget to disable/delete the additional admin account once you are finished.
Hopefully this works for all of you with this problem, I have not yet found any problems as a result of these actions. Feel free to comment on this solution, and of course, make a backup before altering anything in the registry.
References: