Intro
This is my own printer which I have references to in other sections of my site. I plan on
putting more info here but haven't yet. (Just for reference on the quality, I got this printer in Feb of 2002.)
Well now, here it is January of 2010 and I am just now purchasing an Auto-Duplex Unit for this printer. My wife is
getting more involved with her business and we need the double sidedness. Got a good deal on one from eBay.
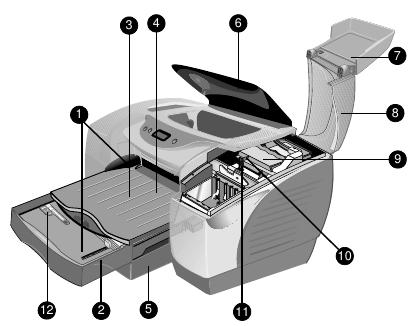
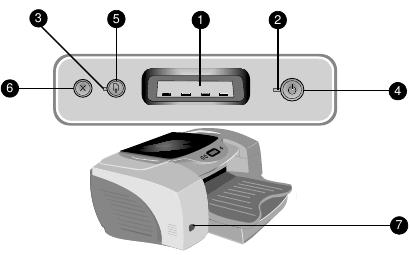
  1 -  Paper guides
  2 -  Tray 1
  3 -  Output tray
  4 -  Front manual feed
  5 -  Tray 2
  6 -  Top cover
  7 -  Printhead cover
  8 -  Ink cartridge cover
  9 -  Printhead access latch
 10 - Hook
 11 - Carriage lock
Ok. It is now December of 2010 and I still haven't installed that Auto-Duplex Unit yet. -But-
things are looking up. Now I want you to notice the Date above that this Printer was purchased. I would like you to also
notice the 'Service Manual' in the selections on the left. This printer has been in service for over 8 years. The only thing
that we have had to do to it, has been purchase new Ink Cartidges, replace the part that I broke and clean the Printheads
as described below. Now, granted, we don't do as much printing as an office -but- we still do a lot and this printer
has held up. Worth every penny of it.
But now it is time to do some more involved Maintenance. The rollers are slipping on the paper
and the Printheads finally need to be replaced. And I am ashamed to say, it is also very dusty. So whilst doing this I'm
gona install my Auto-Duplex Unit. (Nope. Wife wouldn't
let me. She needs the rear end feed and the Auto-Duplex doesn't have that feature!! Have to wait till I have some serious
need for double sided printing.... I did in the past... oh well.)
This is interfereing with my WebPages update -but- ya gota do what ya gota do. Besides
this page probably needed some fixin'.
(Or it will after this cause it will have a combination
of the old style and the new style ... till I can get it all.)
The big fix is described down below ... jump to it from
Here.
Vista & Win7!!! Well, you will find things in here that look like repeats and duplication.
However, if you really read the info you will find that it may be just another way of doing something -or- it has another
way of presenting that makes it more understandable. Primarily on the
Vista and Win7 parts. I'll be dammed if I am gona toss this $500
HP cp1700 printer!! I like it and it has been good to us. Printouts and Pictures. We have done both and with satisfaction.
Contrary to some other's experiences, ours have been good ... till Vista hit. My Wife needed a better computer and the one
I got ... for a fablulous deal ... had/has Vista Ultimate on it. It is fine ... except ... for the printer driver. The claim
is that Vista contains a driver for the cp1700. Well, it may but it is a piece of crap. Hopefully, I will have a positive
response for anyone needing this. Right now all I am doing is gathering info and putting it all here in one place. I am
trying to give credit to all -but- if I miss you, yell and I will add you to the credits.

MS is Culprit: From HP Business Forums.
Don't place the blame for this on HP - Vista's source code switched to a closed format instead of shared so
MS wrote the drivers, -not- HP. Unfortunately they weren't very good at writing the drivers as MS did a blanket
approach to all the families of printers and what they came up with was a generic driver set that gave minimal
print capability.
Now, before you go saying that HP should write their own drivers, I'm sure they would be happy to, however MS
won't let anyone use their source code to write a driver, and MS is refusing to see that there are any issues
with the drivers they have written. So without paying MS a boatload of cash (heck maybe a trainload plus a
planeload as well!) HP is more than likely going to focus their efforts forward on printers that are new to
ensure they work in the hopes that loyal customers will bite the bullet and upgrade to something compatible.
So, there you have the reason that our expensive printers are failing. -But- I'm not so
sure that is a good excuse. If they can write drivers for new ones, then I'm sure they could re-write the drivers
for the older ones... IF they really wanted to. So, what now??? Well, let's see if
we can fix it... cause I believe that the same problem in in Windows 7... which I just got.
Windows 7 Professional.
And now the Info...Finally 
We start by looking at the cp1700's specification:
- 2400x1200 colour printing, 1200x1200 black printing
- USB, parallel port, Infrared, and a LIO slot for an optional module (enables network printing, internet e-services)
- Print on a wide variety of media types, from plain paper and transparencies to thick card stock (up to 72lb or 270 g/m2) and on a wide range of media sizes, from postcards to posters and banners (A5/4x6' to A3+/13x19' and 13x50')
- 16Mb memory with 500Kb buffer
- Two sided printing possible with an optional auto-duplex unit. This comes standard with the cp1700d
- Uses four new, specially designed print heads, as well as high-capacity individual cartridges for each of the black, cyan, magenta, and yellow inks
- Rear manual feed eliminates bending and smudging when printing thick card stock
- Automatic print head alignment
- Media type sensors
- Media width sensors
- LCD front panel shows ink supply levels, print head conditions, printing mode and printer status
- 15Kg weight, with dimensions of 673.3x284.3x575.8mm
- Priced at around $500
Had some printing problems and I had to break down and work on my own system!! Just like a
mechanic, never have time to work on your own ... till it is broke. Now then, some or all of this information will
apply to other HP printers and possibly to other manufacturers as well.
Started having print problems(it is now 2009). There are a couple of reasons. Printheads bad OR just dirty
and the Ink Cartridges empty OR out of date. Now this is a fine printer, that is why I bought it. But it has some strange
and expensive traits. It has not only four Ink cartidges($35 each), it also has four Printheads($35 each). Needless to say,
we don't want to be required to replace these very often. In researching these problems I found this information:
- Try removing the printheads and swishing the tips in a saucer of warm water, blot on a paper towel folded
to 4 ply thickness, repeat. You can set them in the water for a few minutes. The printheads for the cp1700
will stand by themselves in the saucer.
Examine the nozzles, if there is still obvious dry ink left repeat cleaning until ink is gone.
The nozzles are delicate avoid the temptation to scrub them.
- The HP Ink tubs have embeded chips... which have date codes. Therefore, refilling your own is not really an
option. If the cartidge, or tub, excedes the date, it won't work anyway! ... wellll... more on this below.
I did the above on my printer, cleaning of the printheads as described and I replaced the Magenta which was complaining
that the date had expired.(found the info below AFTER purchasing a new cartridge.

) The cp1700 printer, now, still works as good as new.(01 May 09)
Some parts of these Printers are delicate. Soooo, please exercise caution and gentleness
when trying to fix them. Take breaks and try not to get to angry. IF you run into any problems, please, please
search the Web for answers BEFORE using the Hammer.
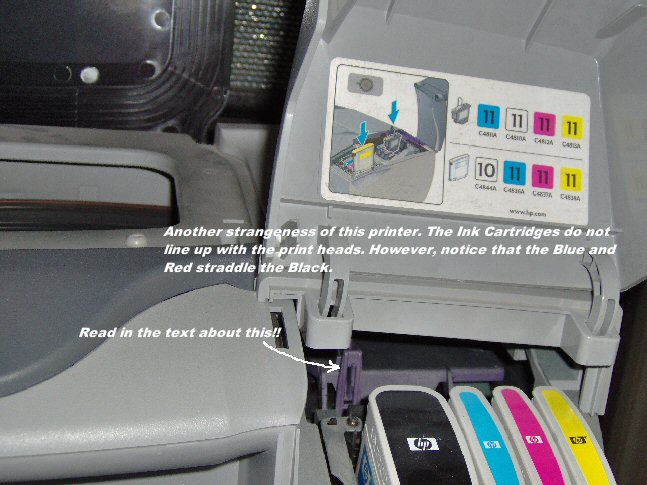
Print minus one Cartridge??
Simple answer is NO, unfortunately this printer even though you may select black only still
prints 'with' color. HP uses a technology called underprinting, the black ink is pigment based and doesn't bond to
paper on its own. When printing to the left it lays down cyan and when printing to the right it lays down magenta,
if you ever took time to look at the order of the print heads you will see that the cyan print head sits left of
the black print head and magenta is on the right.
So, when you print using the underprinting method, the pigment ink black bonds to the dye of the color ink and then
bonds to paper, this allows the black ink to dry alot faster and you're able to move on. Unfortunatly this means that
this printer doesn't support printing with one cartridge.
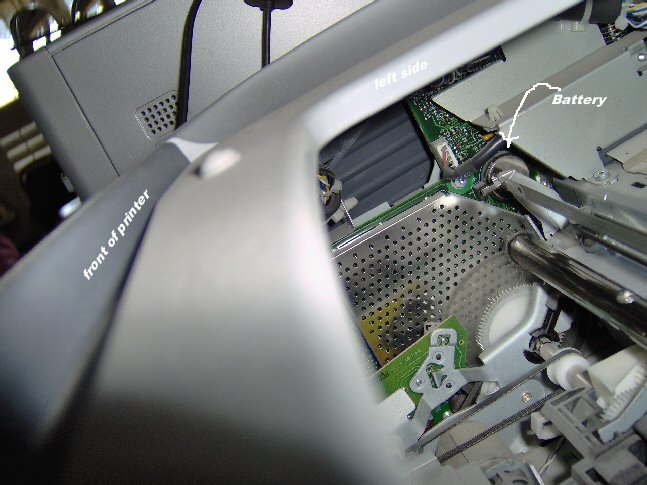
Battery In the Printer!!
It appears that HP wants you to 'Maintain Fresh Cartrides'... OR they just want to make more
money under the guize of this concept. At any rate, there is a battery in this printer on the, as you face the printer
from the front, left side.
Now then, it was mentioned above that the Cyan, Magenta and Black all work in conjunction with
each other. Nothing was said about the Yellow. However, if that is all you have, it isn't very much good anyway.
Yellow doesn't show up very well on White paper.
Now then, I'm told that you can defeat the date code check by removing the battery. So,
if you are a penny pincher then you can try that. However, I found a lot of difficulties in trying to refill
these cartidges. -But- I lack patience and dexterity sometimes on some things. I, personally, think that new
cartridges are better anyway. It will definately be the correct ink.
Printhead Latch

The cp1700 has an over-the-center Printhead Access Latch which, if you are not careful, can be
broken. Needless to say, I broke mine!! It could not have cost more than a buck to make, if that. It is shaped like an
inverted Y with hinge pegs on either end of the Y and a slot in the upright portion.
In the pic on the right you'll see one of the pegs on the part is broken off. This was because...
I forgot how to properly open the Printhead Access Cover. The printer can now be totally non-functional,
since the unit will refuse to operate without the latch engaged. (I was lucky. I was able to get it to latch with just
one of the pegs engaged.)
If you have forgotten OR don't know... you must first turn the printer on. Then open the Ink Cartridge / Printhead
Access cover. Wait for the Printhead Carriage to move out from the side of the printer cover. Then Pull the power
cord out from the back. (IF you turn the power off with the power button, the carriage will go back under
the main cover.) You must push down and lift up on the Printhead Access Cover in order to release the latch.
It's like standing on one foot, patting your tummy and rubbing your head. Anyway, if you do it
correctly the latch in the front will almost fall off.
(do it wrong and you break it)
The hard part, really hard part, was finding another. You can -not- get them from HP. If you call their
Tech support, they won't even know what you are talking about!! If you know the internal HP part number they can order it,
but without that magic part number you're screwed.
In my searches
I found another answer -AFTER- I found a parts place... and paid $25 plus shipping ... for the new latch.(cp1700 Parts in
selections on the left; Part Number: C8108-CARRIAGE_LATCH)
Another individual also broke his and ran into the same problems. However, he had an ingenious fix.
You take the broken part as a template, get a #12 ACCO Binder clip, remove one of the bent wire handles, rebend the ends a
bit shorter, using the original part as a guide, clip the ends off a bit, replace the original with your home made version
and Viola! the printer hums along fine.
Taken from: Texas Parts Scam
Print Jobs Fail to Be Deleted from Print Spooler
In Windows 2000 and Windows XP, print jobs can get caught in the print spooler, which causes
pending print jobs -not- to print.
WINDOWS 2000
- Click Start, click Settings, and then click Control Panel.
- Double-click, or single-click, Administrative Tools. (depends on your mouse click set-up)
- Double-click, or single-click, Services.
- Under Name, find and right-click Print Spooler, and then click Restart.
A progress message appears and the print spooler should be clear.
You can now print or remove the printer driver as required.
WINDOWS XP
- Click Start, and then click Control Panel.
- If Control Panel is in the Classic View, click Switch to Category View.
- Click Performance and Maintenance.
- Click Administrative Tools.
- Double-click, or single-click, Services. (depends on your mouse click set-up)
- Under Name, find and double-click Print Spooler. The Services window opens.
- If the Service status is Stopped, click Start, and then click OK.
If Service status is Started, click Stop, click Start, and then click OK.
You can now print or remove the printer driver as required.
The actual HP page for this, with pictures can be found at:
Print Spooler Errors
LCD panel and infrared lens
Figure 1: LCD panel and infrared lens
- LCD
- Power LED
- Resume LED
- Power button
- Resume button
- Cancel button
- Infrared lens
More information can be found at:
HP Support
Posted on January 28th, 2013 by TRComputing
From HP
HP Color Inkjet cp1160 and cp1700 Series Printers - Printing Manual Duplex
Information
It is possible to print on both sides of the paper (duplex) without an automatic duplexer. Print on one side of the paper and then reload the paper into the printer to print on the other side of the paper. Follow the instructions below to print manual duplex.
Click Start
, Settings
, and then Printers
. For Microsoft Windows XP, click Start
, and then Printers and Faxes
.
Right-click the printer icon and do the following:
-
In Windows 98 and Me, select Properties
and then Features
.
-
In Windows 2000 and XP, select Printing Preferences
and then Features
.
-
In Windows NT 4.0, select Document Defaults
and then Features
.
-
On the Features tab, under Document options, select Two-sided printing
.
-
If two-sided printing was not previously selected, you may be prompted to reduce content. Read the descriptions for the two options and choose the best one.
-
If you were using the automatic two-sided printing module, remove the checkmark from Automatic
and then click OK
. Manual duplexing is now enabled.
-
Print the document and follow the instructions on the screen to print on both sides of the paper manually.
End From HP
Installing auto-duplex unit (optional accessory)
We have two panels. One is the normal panel and the other is the Auto-Duplex panel.
When the HP Auto-Duplex Unit is installed, the rear manual-feed is unavailable. Also keep in
mind that the Premium Paper and the Photo Paper will not duplex.
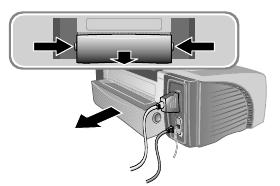
- At the rear of the printer, push the buttons on both sides of the rear access panel.
Then, slide the rear access panel out.
- Slide the auto-duplex unit into the rear of the printer. Do not press the buttons on either
side of the auto-duplex unit when installing it. Use these buttons only for removing the
auto-duplex unit from the printer.
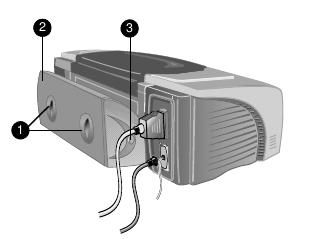
- HandlesPush these handles toward each other to remove the rear
cover from the auto-duplex unit.
- Rear coverRemove this cover to clear paper jams from the auto-
duplex unit.
- ButtonsPush these buttons in to remove the auto-duplex unit
from the printer.
To perform auto-duplexing
- Load the appropriate paper in Tray 1, Tray 2, or the front manual
feed.
- From the Start menu, click Settings, and then click Printers to
open the Printers folder.
- Right-click the icon for the printer, and then click Properties
(Windows 95 and Windows 98), or Printing Preferences
(Windows 2000), or Document Defaults (Windows NT 4.0).
- Click the Features tab, and then click Advanced Features.
- Under Document Options, click Two-Sided Printing (Duplex). If
the print margins need to be adjusted, the Two-Sided Printing
Margin dialog box appears. Make a selection, and then click OK.
- Make sure that the Automatic check box is selected.
- Click Book or Tablet to select the page orientation.
- Click OK to close the dialog box.
- Click OK to print.
When printing is complete on one side of the paper, the printer holds
the paper and pauses while the ink dries. Once the ink is dry, the paper
is pulled back into the printer and the second side of the paper is
printed. When printing is complete, the paper is dropped on to the
output tray.
CP1700 Service Stall Error Message.
The Problem:
(as reported by Jack Pyburn on HP forum)
Every single time we send to print to one of them, it displays an error message that says
"Service stall... press resume to continue." Pressing resume does not clear the message. It only feeds a
sheet of paper through. So does pressing cancel. The only way to clear the message is to unplug the machine
and press on again; and even then, the error message sometimes returns once the carriage has settled.
Possible Fix: (as reported by Rudy on HP forum)
Tom and others...there may in fact be a bit of drag that is popping that error up.
There is a procedure for cleaning the carriage rod that is not "blessed" by HP but I suggest you try it anyway.
low tech.low cost
Supplies req'd: lint free cloth, distilled water, TriFlow lubricant (Teflon based).
Lift the hood and unplug printer
clean the carriage rod with a damp, lint free cloth...continue until it comes back clean.
You may now apply 2-3 drops of triflow to that rod. Spread it around, wipe off excess.
Triflow is available in 2oz bottles at bike and sports shops as well as the REI web site (www.rei.com). It's about $3USA.
Tom...you mentioned noise at start up....lift the hood and, using a small flashlight, inspect over on the right for waste
build up....deposits may be cleaned up with distilled water and cue tips....messy but effective.
Good luck
And Another: (as reported by Rick Hamilton on HP forum)
I have found that if you remove the right rear cover and turn the motor until the service station is
in its most rear position, you will find a tower of ink that needs to be cleaned out. Just remove the tower
with a q-tip. Check the connection on the motor and reassemble. This should clear the problem unless it has
been damaged due to trying to run it way to long.
The ink build up works as glue to hold the service station in place and once removed, should allow the printer
to function. Feel free to email me with any questions.
rickhamilton@printersolutions.net
And Another: (as reported by sari on HP forum)
try to open the cover and check there is a plastic graduated wheel located on the left side and just stamped
with a light glue ,,, if that wheel is not in its place this will let the printer to stall and can not
initialize ... also check that in the other side ( right ) there is a protection plastic may be you find it
jammed
I solve these two problems and my printer is now perfect
have a nice day
Sadok Mnasri TUNISIA
http://www.linuxfoundation.org/collaborate/workgroups/openprinting/macosx/hpijs
http://openprinting.org/show_printer.cgi?recnum=HP-Color_Inkjet_Printer_CP1700
http://uw714doc.sco.com/en/hpijs/hpijs_readme.html
Paper Sizes
HPIJS selects the paper size based on the physical paper size determined by Ghostscript.
The following standard paper sizes are supported by HPIJS.
| | | inches: | postscript units: |
| 1. | Letter | 8.5 x 11 | 612 x 792 |
| 2. | Legal | 8.5 x 14 | 612 x 1008 |
| 3. | Ledger | 11 x 17 | 792 x 1224 |
| 4. | Executive | 7.25 x 10.5 | 522 x 756 |
| 5. | A3 | 11.69 x 16.53 | 842 x 1190 |
| 6. | A4 | 8.27 x 11.69 | 595 x 842 |
| 7. | A5 | 5.83 x 8.27 | 420 x 595 |
| 8. | A6 | 4.13 x 5.83 | 297 x 420 |
| 9. | Photo | 4 x 6 | 288 x 432 |
| 10. | B4 | 10.126 x 14.342 | 729 x 1033 |
| 11. | B5 | 7.17 x 10.126 | 516 x 729 |
| 12. | Oufuku-Hagaki | 5.83 x 7.87 | 420 x 567 |
| 13. | Hagaki | 3.94 x 5.83 | 284 x 420 |
| 14. | Super B | 13 x 19 | 936 x 1368 |
| 15. | Flsa | 8.5 x 13 | 612 x 936 |
cp1700 A3 Driver in XP - Vesion 1.4
From:
Software Driver Download
- file will be cp1700En.exe and it is 41.6MB in size.
| Description: |
|
This is the full version of the cp1700 printer driver (size of 42 MB). There is another [lite] version which is 2 MB in size.
Included in the Driver File
- Installation instructions
- The printer driver uninstaller
- The hp cp1700 toolbox
HP cp1700 Installation Instructions
- Download the cp1700En.exe file to a temporary directory on your local hard drive, e.g. c:/temp/
- Double click the downloaded cp1700En.exe file to extract all necessary components onto a folder named /cp1700/ and initiate an automatic launch of the setup program.
- Follow the step-by-step instructions on your screen.
Fixes in this New Driver
- NTFS access rights printing issues. the print dialog box cannot be shown
- Errors occurring during upgrading from Setup v1.1 to Setup v1.4 (LPT)
- Installer hangs if user launches toolbox before the driver upgrade.
- Silent installation fails in Win XP
- PNP installation from floppy disks fails
- PNP through root INF (USB & LPT) installation fails
Known Issues/limitations
- While installing the driver V1.4 using the USB setup method in WinXP, two printer icons are created in the printer folder.
- While running the Setup program for driver version 1.4 through the Network ( Basic or Peer to Peer Network setup) , [Printer not supported] is displayed on the screen.
This occurs for the following Print Servers: 380x, 310x, J7942A .The following print servers do not display any error messages: 500, 300, wp110, 170, 175, 250.
- Error code is displayed when trying to monitor DOT4 connection from toolbox. This occurs while upgrading the Printer from the Web Release 1.1 Setup to the CPE RC3 v1.4 through Add Printer.
- The printer status tab displays [Unable to monitor printer}. This occurs while installing driver 1.1 using Add Printer. After rebooting and launching the toolbox this message comes up.
Workaround: Reboot once again and launch the toolbox.
|
XP drivers on Vista and Windows 7
The notes from individuals I have copied below were concerning operations in Vista.
Turns out that we will have the same problems in Windows 7. Like many people have said, "Windows 7
really should have been Vista Service Pack 3." I will verify that in the next few days. I got a copy
of Windows 7 Professional for my wife's PC ... for her Birthday.
From: Josh Duvauchelle on eHow
Windows XP is an operating system released by Microsoft in
2001.
Windows XP was replaced by the
Windows Vista
operating system in
2007. Many individuals who transitioned to
Vista still wish to use peripheral devices
(such as printers) that require
Windows XP-specific drivers to function. Learn how to use
Windows XP drivers on
Windows Vista to keep such peripheral devices, save time and transition to
Vista seamlessly.
- Download the respective installer package for the driver you wish to install on Windows Vista. The installer
package is located on the original manufacturer's installation disk that came with the device you're
installing. It may also be available from the device manufacturer's website.
- I'm going to inject a comment here. You can't do what he is saying -UNLESS- you copy from the CD
-or- DVD that contains your drivers, to a directory or folder on your hard disk...or a USB Stick.
- Now on the modifiable copy - Use your mouse to right-click on the installer package for the driver.
- Click "Properties" from the pop-up menu. A preferences window will appear on the screen.
- Click the tab that reads "Compatibility."
- Click the check box next to "Run this progam in compatibility mode for...."
- Select "Windows XP" from the drop-down menu and press the "OK" button to apply the changes and close the window.
- Install XP drivers in Vista. Double-click the XP driver's installer package. Windows Vista will now open the
driver in Vista Compatibility Mode. The Windows Vista operating system will tell the XP driver that it is
running on a Windows XP machine, thus allowing the installation process to continue where it would otherwise
have stopped.
In a nutshell, you are going to have to modify the installer and all Programs that are in
this driver set to run in the Compatibility mode.
Also from Josh:
Windows Vista is an operating system created and developed by the Microsoft Corporation.
Vista is intended to be
the direct successor of the
Windows XP version of the
Windows operating system. Due to software differences,
Windows XP drivers are not directly compatible with
Windows Vista. This technical challenge can be overcome if
you install
XP drivers in
Vista so that your old
XP devices work with the new operating system.
- Click the "Start" menu in the lower left-hand corner of the Windows Vista screen.
- Select "Run" from the Start menu.
- Type "msconfic" in the Run box. Click "OK." A window will appear that lists all of the programs scheduled to run
when Windows Vista is turned on. Uncheck all unessential software programs. Be sure to leave critical programs
checked, such as antivirus and firewall programs. Click "OK."
- Click the "Start" menu and select "Restart" to reboot the computer.
- Open "My Computer" (located in the Start menu or on the Vista desktop).
- Double-click the "C:\\" drive. Find the installation directory for the Windows XP program or device that you
wish to run in Windows Vista. The installation directory is usually given the name of the program, the
program's manufacturer, or a shortened version of either of these two options.
- Right-click the program or driver. Select the "Properties" option in the pop-up menu that appears.
- Click the "Compatibility" tab in the window that appears. Check the box next to the heading that reads,
"Run this program in compatibility mode." In the drop-down menu, select "Windows XP." Click "OK" to close
the window.
The program or driver will now operate in Windows Vista in Windows XP compatibility mode, allowing the
driver to function as it did in Windows XP. Note that the Windows XP driver will not be able to take
advantage of any of the new features in Windows Vista while it is running in compatibility mode.
And from: Joanne Mendes on eHow
Microsoft's Vista operating system has a lot of compatibility issues with older software programs and their drivers.
Often
Vista doesn't recognize their drivers or the drivers won't work properly in
Vista.
Fortunately,
Vista has a built-in
compatibility program that will allow you to manually change a program's driver to the older
Windows XP version.
- Click the "Start" menu.
- Click on "All Programs."
- Right-click on the program that you want to run using a XP driver.
- Click "Properties."
- Click the "Compatibility tab."
- Check "Run this program in compatibility mode with Windows XP."
- Click "OK." The program will now run using a Windows XP driver.
Perform these processes for each driver file you want to install, but be careful to
monitor the entire process and verify that it actually works before proceeding with the use of your hardware.
Custom Design - By eHow Contributing Writer
# One of the greatest problems of using various applications and other installers on
Vista is that many of these
applications have been designed to work with a particular operating system such as
Windows 2000/XP or in
many cases
Windows Millennium/Win98. Specifically, because of the change in folder locations that
Vista made many
software package installers had to be rewritten so as to ensure that the software would install correctly. As a
result, the installers needed to be completely rewritten to become compatible with any newer operating systems.
Workarounds - By eHow Contributing Writer
#
Microsoft Windows makes use of a different type of technique to ensure any compatibility for plug and play
devices such as USB devices. The Microsoft development team has written software programs called "shims" which
are meant for different types of applications so as to fool them into working properly on
Windows Vista. In many
cases these shims have prolonged the working life of various pieces of hardware but should not be counted on to
work magic.
Another printer's solution ... possible with us...
You can install the SiPix in
XP, Vista, and
Windows 7 x86 (32-bit) by adding the printer manually from the Printers
list ("Add New Printer"), choosing the COM port you've hooked it up to, and then when
Windows asks for the driver
have it look for the driver in x:\Win2000. (x is the letter of the drive containing the Sipix CD). It will prompt you
that the driver is not "certified", but tell it to install anyway, and you will have your Sipix working in XP and
Vista. I was unable to test in
Windows 7 because I use an x64 version and there aren't any x64 drivers for this
printer.
Use Windows Vista Compatibility Mode to Install Windows XP Drivers
If you really cant find
Windows Vista driver for your hardware, you can try to fool the driver installation
program to install in
Windows Vista. How? By using
Windows Vista Compatibility Mode so that the driver
installation program think it is installing in
Windows XP mode.
Here is the picture of how to set
Windows Vista Compatibility Mode
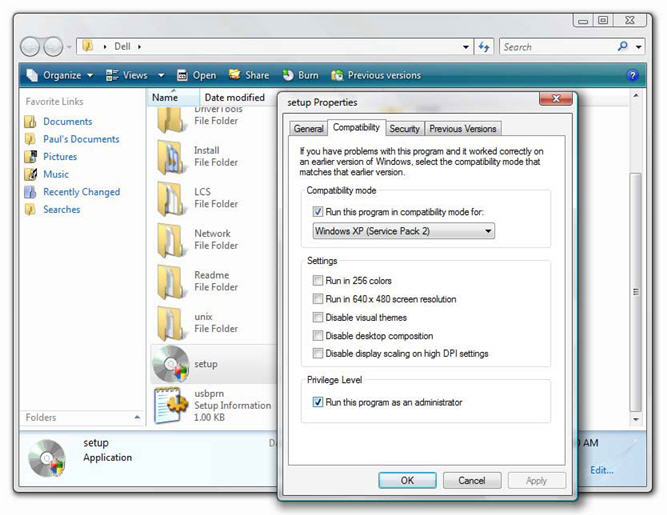
Image source: http://www.winsupersite.com/
Driver Removal - Fixes
Please do note that in the rare eventuality the the Driver Verifier Manager does find a non-conforming driver,
there could be possibility that it may not be the offending one. So do exercise extreme caution. Regard the
identified Driver/s with suspicious and exercise your best judgment in such case.
Having narrowed down to the problematic Driver, you have 3 options : Update, Roll Back or Uninstall the Device Driver.
To do that, open Device Manager. Open the properties dialog box for the device, and use the following buttons on
the Driver tab to perform maintenance tasks:
Update Driver : This will start the Hardware Update Wizard.
Roll Back Driver : This will uninstall the most recently updated driver and will roll back your configuration, to the earlier version.
Uninstall Driver : This will uninstall completely the drivers files and registry settings for the selected hardware. |
| Best to always create a system restore point first. |
Image Source: http://www.winvistaclub.com/t3.html
Top
The Big Fix
10 Dec 2010 Ok, here it is, the Big Fix. The first thing
to do is to clean it thoroughly. This procedure is described in the Users Manual. Now IF you have your
printer connected directly, you can find out the state of it from the Toolbox IF you have it installed.
We have ours Networked through a Netgear Printer Server so that doesn't work for us. Now this is stated
in the Users Manual:
The printer does not require scheduled maintenance. You should
attempt, however, to keep the printer free of dust and debris. This
cleaning keeps the printer in peak condition and might also make the
diagnosis of problems easier.
REMEMBER!!
If you have forgotten OR don't know... you must first turn the printer on. Then open the Ink Cartridge / Printhead
Access cover. Wait for the 'Printhead Carriage' to move out from the side of the printer cover. Then Pull the power
cord out from the back. (IF you turn the power off with the power button, the carriage will go back under
the main cover.) You must push down and lift up on the 'Printhead Access Cover' in order to release the latch.
It's like standing on one foot, patting your tummy and rubbing your head. Anyway, if you do it
correctly the latch in the front will almost fall off.
(do it wrong and you break it)
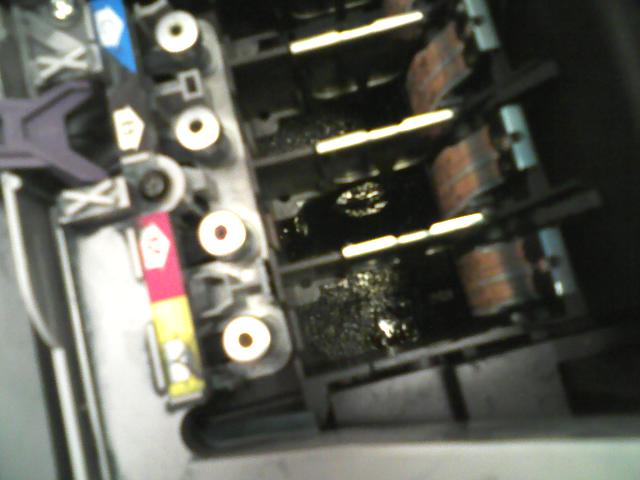
Well, now, removed the Printheads and looky what we found. A big pile of Goop under
the Printhead cariage. Because of the angle at which I took the picture, it looks like it is under the Red Printhead.
It isn't. It is under the Black Printhead. Now we know where a lot of our Ink goes. It appears because of the
consistency of the Ink, the Black one leaks! Can't think of any other reason for the pile. Not sure how to get it out
of there either?! I don't feel like taking this thing that far apart right now and it doesn't appear to be hurting
anything ... yet.
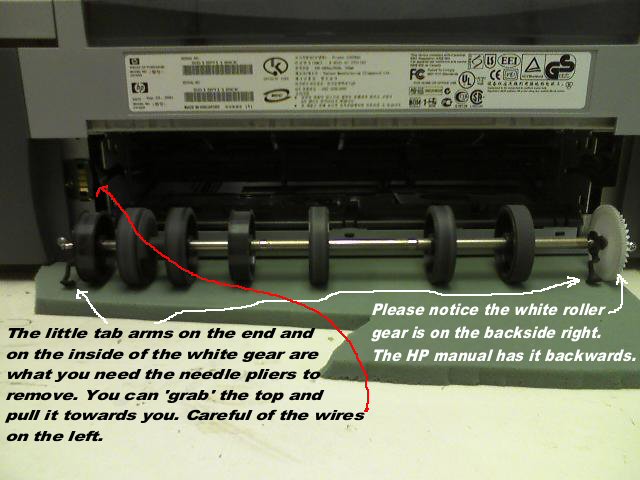
Ok. Now pay attention here...