April 4th, 2018 Everything has changed...
go Here and...
https://www.getdroidtips.com/install-official-twrp-recovery-for-htc-10/
Verizon Official RUU/radio/firmware collection
<- The original OP has departed and I agreed to help the new one... IF he needs any.
December 4th, 2017 Yeah, I get out of sequence... a lot. But here are references to some
TWRP info.
TWRP 3.2.0-0 Recovery
and HTC 10 PME TWRP
and PGP Keys
October 26th, 2017 Once again we got an
OTA UpDate -and-
could NOT install it -- even though we had installed Magisk . Tried to read over everything that I could find concerning
Magisk
and OTA's,
but it really appears that it is not any easier, or cleaner, than what we had been using. So on this
"OTA UpDate/Restore" we are
still gonna install Magisk for the root
-and- maybe for the next UpDate I will be able to use Magisk and not have to do the RUU.
I want 'root' on my phone... just because.
July 7th, 2018 An UpDate: Setting Write access to your external SD card.
Refer: Enable Write Access Permission In Android Device Without Root
The use of "FX" was the same but the part about "Documents" was NOT the same.
I do believe that he was using a different phone.
-
Now then, in order to do this... root the phone...
your device will need to be either bootloader unlocked, S-OFF'd, or both.
This can be accomplished by visiting the 'boys' at:
SunShine Bootloader Unlock/S-off
Then follow my directions here; which I copied from here:
Root Your HTC 10 & Install TWRP
and various other places. Trying to get it all in one place. The first part of this concerns installing an RUU cause I could not get the
October OTA
installed with Magisk and TWRP installed. Supposed to be able to do that -but- I have not figured it out yet.
- Save the pics and make note of the apps that are wanted to re-install.
- Flash RUU to revert to stock using SD card method.
Which is renaming your RUU and placing it on the root dir
of your external SD card.
Nougat 2.41.605.20
Nougat 2.41.605.23 Nougat 2.41.605.30
- From a previous UpDate, had TR70-2PS6IMG.ZIP on SD card and renamed it to 2PS6IMG.ZIP.
You do NOT want to leave the later name on the card when you are finished.
(I had to break up the name in order to get the page to
display properly in my DreamWeaver.)
The actual RUU was/is:
2PS6IMG_PERFUME_WL_N70_SENSE80GP_VZW_MR_VERIZON_WWE_\
2.41.605.20_Radio_1.0.C010252@61117_CNV_1.06_002_release_505547_signed_2_4.zip
- Re-booted to ' Bootloader ' then remembered I had to go to Download Mode .
- Switched via reboot to Download Mode .
- pressed 'Volume Up' button to confirm flash of RUU
- As soon as the RUU had been flashed sucessfully, that's it. We are now Full Stock again,
or updated to latest software version!
- After the RUU installed all the 'Bloatware' got reinstalled.
- Gave it a couple of hours to get settled... and do NOT forget to rename -or- remove the 2PSIMG.zip file.
- **** Ah yes... DO NOT forget about the OTA's.
In this case, the RUU installed 20, but I still need
23 and 30.
Settings -> System update -> Check for system update
Will have to do the above check twice, in order to get both.
- =====Now for root=====
- Enable Developer Options
and USB Debugging
on the phone.
- If you haven't already... connect your phone to the PC via the USB cable. Select File Transfer mode.
- Open a terminal window on your computer. (this color equals computer)
- adb devices
- adb reboot download
- fastboot devices
- fastboot flash recovery /windows/G/HTCM10/twrp-3.1.1-0-pme.img
target reported max download size of 800000000 bytes
sending 'recovery' (21992 KB)...
OKAY [ 1.862s]
writing 'recovery'...
(bootloader) HOSD CL#774095
(bootloader) start@1
(bootloader) recovery@100%
(bootloader) Update partition OK
(bootloader) end@Done
OKAY [ 2.692s]
finished. total time: 4.554s
- fastboot reboot-bootloader
Scroll down on phone to reboot to recovery
Back in TWRP Swipe to allow modifications.
You'll be taken to the TWRP main menu screen.
- Select "Reboot" and then "System" to reboot your phone. And we have TWRP installed.
- Reboot into TWRP Recovery:
adb reboot recovery
- In TWRP tap on "Install".
- Navigate to where you have the Magisk Zip file and select it.
- Swipe the slider at the bottom of the screen to install Magisk , then tap "Reboot System." Personally,
I clear the Cache first.
- Note: You will not have to add the Magisk Manager IF you got one of the 14.x , or later, versions. It is part of the installation.
I installed version 14.3. November 6th, 2017
- =====We are now "root'd" again=====
- Installed 'Purchased Apps' so I could get a couple that I already purchased.
- 'ai.type keyboard Plus' installed, so can remove 'Touch Pal'.
- Installed 'Termux' so I can do some Linux operations. Like removing Bloatware.
- Installed 'Linux Cheatsheet'. Can't remember all them commands.
- Installed 'HTC Weather Clock'. It is one of the reasons I got an HTC phone in the first place. Silly, maybe, but
that is the case.
- Installed 'Next Launcher 3D shell'. Like the way it looks and works.
Got ver 3.7.3.1 (Oct 26, 2017)
- Installed 'Pacer Pedometer'... 17:28pm on Oct 28th, 2017.
- Installed 'AccuBattery'... 21:01pm on Oct 28th, 2017.
- Installed 'App Manager'... 21:34pm on Oct 28th, 2017.
- Installed 'Calendar Widget' and 'Calendar Key'... 15:53pm on Oct 29th, 2017
- Installed 'Next 3D Switch Widget'... 21:47pm on Oct 29th, 2017
- Remove Bloatware ... or just apps that I don't want.
Android partitions explained
It is late at night and almost midnight. Trying to Unlock and Root my new
HTC M10.
Like everything else... it is different. First thing you must do is enable the "Developer Options". Then you must
visit them and enable "USB Debugging" -and- "OEM Unlock". Problem is... I can not find the OEM Unlock!!
Just searched the Web and viewed a U-tube vid that showed the selection -but- it is NOT on my phone. However, Verizon
just put out an UpDate and I am installing it now. Maybe it will have the UnLock. At present it is optimizing my apps. Says that
there is 109 of them. Didn't think that I had added in that many.

Well, it finished and I still do not have the "OEM Unlock" setting. At this time there is a
"Mail-In" service that will 'fix' it:
SunShine Bootloader Unlock/S-off
However, before I mail it off I am going to theVerizon store
and complain. Maybe I can get it 'fixed' there. ... Nope!!
XDA - rooting and stuff
HTC 10 > HTC 10 ROMs, Kernels, Recoveries, & Other Development
How To and Why You Might Want to.
September 4th, 2016/1:47pm Well, I sent it off in July and got the "UnLock". Now there is an
OTA UpDate which I can not get. Can't get them when you are "rooted". More 'game' playing. So, the following talks about going back to stock
via an RUU(ROM Update Utility). However, this will wipe out your installed aps and data. So we need to back things up before doing this. It will be
restored to the Factory State.
RUU File: 2PS6IMG.zip
2PS6IMG_PERFUME_WL_M60_SENSE80GP_VZW_VERIZON_WWE_1.19.605.9_Radio_1.0.C010031@ \
60330.2_CNV_0.81_002_release_475304_signed_1.zip
The md5 for this file is ce38ca7543d3829eb3980a24fe2c752a
2PS6IMG_PERFUME_WL_M60_SENSE80GP_VZW_VERIZON_WWE_1.85.605.9_Radio_1.0.C010141a@ \
60722.2_CNV_0.93_002_release_492297_signed_1.zip
The md5 for this file is 6fddd4eb843d35240f4c363aa9d2c03e
and a file size for both of 2GB.
Refer:  -and- HTC 10 by dottat
605 = Verizon US ; 617 = Unlocked

					http://www.htcdev.com/devcenter/downloads
Method 3: How to Install Stock RUU zip File on:
Verizon HTC M10 and International?
Restore to Android 6.0.1 Marshmallow Firmware
Here is an alternative and easy method to install the RUU.zip file on both global and Verizon
variant of the HTC M10.
Step 1: First, rename the RUU zip file to "2PS6IMG.zip", save it to the root of your external SDcard.
[Put the name of the firmware. For instance,
HTC M10 begins with 2PS6IMG and
Verizon
begins with 2PS6IMG.zip]
Step 2: Reboot the phone into bootloader mode. Refer to the method one in order to boot into bootloader.
Boot into the bootloader or Fastboot mode. To do so, turn off your device and then press and hold volume down + the power button simultaneously
for a few seconds. When you see the bootloader screen, connect your device to the PC using a USB cable.(Choose Fastboot if option is available)
An alternative method:
You can also issue the following command through your cmd or terminal, while connected to the PC, in order to boot into the bootloader. First
setup ADB and Fastboot environment from requirements and then follow instructions till step 5. Once into the command prompt or terminal, issue
the following command:
adb reboot bootloader
Step 3: Now it will start scanning the SDcard and detect the 2PS6IMG.zip file.
Step 4: It will ask, "Do you want to start update?".
Step 5: Use your volume Up/Down key to start(yes) or cancel(no) the flash.
Step 6: Wait for the process to complete and don't turn off your phone during the flash.
September 5th, 2016/6:43am UpDates!! Did I ever tell you
how much I hate UpDates??? Yes... I probably did, but I'm saying it again. Hate them especially when they change the way they do UpDates. And
when they don't make the files available for personal installation. Which is what HTC did with this latest OTA UpDate for my HTC M10.
Well, I tried both ways 2PS6IMG with and without the .zip. Neither worked. So, I am
performing a Factory Reset!! Right now it is oprimizing apps... 79 of them. And it is taking some time. Then we get Preparing Google app
then we get preparing your phone. And finally a Welcome... then WiFi connection... then it wants my Gmail address...
Well, now it is finished ... or so I thought -but- it is bringing down those apps that I said I didn't want!! Need to wait
for it to finish and then try the OTA UpDate. Don't think it is gona work cause TWRP is still there.
Factory Reset
A master reset restores the original factory settings and may delete your personal data on the internal storage, such as downloads,
ringtones, images, apps, contacts, and Visual Voicemail. It does not delete data stored on the SIM card or SD card.
To perform a master reset, follow these steps:
- Back up all data on the internal memory.
- From any Home screen, tap Apps.
- Tap Settings.
- Scroll to 'PERSONAL,' then tap Backup & reset.
- Update the following as desired:
- Backup my data (on/off)
- Automatic restore (on/off)
- Tap Factory Data Reset.
- If screen lock is enabled, enter screen unlock information to proceed.
- If desired, select Erase SD card.
- Tap Reset Phone.
- Review the 'Warning' message and select either:
- If you tap OK, the phone will perform a master reset.
Februaru 23rd, 2017/11:15pm
Just Factory Reset my phone... again... so in effect I have a new phone.
Later: After the Factory Reset I was able to ReBoot into the
bootloader -AND- install the 2PS6IMG RUU!! Once again we are installing and optimizing the apps. This time only 44 of them.
This is a Real PITA to get an UpDate. Don't think I will do this again until Nougat is available.
Well, Nougat became available March 30th, 2017 and it obsoleted the
following. You need to get a new file and do it differently
until everything gets straight. Steps to follow now can be found here:
Chainfire Recovery
TWRP for the HTC 10
April 3rd, 2018 We installed
December 8th, 2018 We installed version 18 and it crashed
our phone!! Got stuck in a boot loop. Didn't take the proper precautions ... like making a backup. Had to reinstall the whole system!!
Installing Magisk
Using Magisk
January 28th, 2019
Yeah I am jumping around... a lot! This web page has no order and possibly should be more individual ones ... but... well. Anywho, I was looking again
into installing version 18. Over on the XDA forum
I found this:
Magisk Help
I now have Magisk 17.1 installed on my
Nougat Android Ver 7 . Think that I am going to leave the OS
and Magisk at these versions. Phone works and does everything that I need and want. Only reason for going
to a never version on either would be just to say I have the latest and.... I am no longer into that. To old... leave that for the younger set.
I now spend more time with my Dakotah
(A Beautiful GSD/Husky) and watching TV with my wife (A Beautiful Lady).
BUT... I do read some of the stuff. However, the time of day and how much sleep I've had influences my reading ability.
Reading the above mentioned forum -and- the following reference, I found that I need kernel version 3.8 or higher. I read my kernel version and found
that I have 3.18. My sleepy eyes and brain thought that was to low!! Well, if you open your eyes, and take a drink of coffee, -and- think in two digits, 18 is higher than 8!!
Magisk and MagiskHide Installation and Trouble Shooting Guide
More help info
July 7th, 2017/evening Whilst shopping in Wal-Mart I got notice of another
UpDate for my phone. I put it off till later that evening and when I tried... I couldn't get the UpDate. I am SU rooted and have TWRP . Now I have a
choice. Either wipe it all back to Factory and start over -OR- try this Magisk that is supposed to get root and hide the fact.
- First I must remove SupperSU and we do that by the Un-Install inside SuperSU itself.
- TWRP is already installed, and in fact it is used to install Magisk .
- Coped v12 and v13beta to my SD card.
- Re-Booted into TWRP Recovery.
- Tapped Install.
- Moved up a level and selected the external_SD card.
- In it I selected Magisk-v13.0(c4377ed).zip
- Then Swiped to Flash.... It finished with no reported errors.
- There were two buttons at the bottom and one was "Wipe cache/dalvik" and the other was
"Reboot System". Well, from previous experience with my ReZound, I tapped the Wipe cache/dalvik first.
Then a swipe to wipe. Next I tapped the Reboot System.
- Tried OTA UpDate again... Didn't work!!
- Looks like I am gona have to remove TWRP but I haven't found a stock recovery yet. Think there is one in the RUU
but that will be a challenge, maybe...
- Completely UnInstall Magisk
Install Magisk
- Download and Install Latest Magisk Manager Apk (Don't Run).
- Download the Magisk-v14.6.zip copy to SD Card.
- Turn Off Your Phone.
- Turn Into Recovery Mode.
- Go to install than navigate to the Magisk-v14.6.zip file.
- Swipe for Install.
- After install wipe cache.
- Reboot and Enjoy Magisk.
- I almost immediately got asked to accept the UpDate to 15.0 and I did.
OTA Installation Tips
Latest Magisk 14.2 and 14.3
Magisk Main
Magisk Beta 13.0
Install and use
magiskmanager.com
XDA Forums Magisk
Magisk 14.6
Had to run the RUU...twice!! When it finished installing it took a long time in the boot up... both times. Why twice?? Cause the first one
wasn't new enough! Thought I had
(
Ya know, I will never understand this HTML stuff. One minute something works, and then
it doesn't and then it does. I have been having "LOTS" of trouble getting this to display properly in my DreamWeaver
because of things going over margin. You will see, IF you look, various ways to get it to work. Yes!! I am putting to much in one page. -AND- it does NOT display
in DreamWeaver the same way it does in Firefox. )
2PS6IMG_PERFUME_WL_N70_SENSE80GP_VZW_MR_VERIZON_WWE_
2.41.605.18_Radio_1.0.C.zip -but- I had
2PS6IMG_PERFUME_WL_N70_SENSE80GP_VZW_MR_VERIZON_WWE_
2.41.605.12_Radio_1.0.C010252@61117_CNV_1.06_002_release_497900_signed_2_4.zip!!
(
long names 
)
The OTA would NOT install with the
12 version. Had to be
18.
Notice the OTA is
2.41.605.20. This is supposedly a
June "security" UpDate from Google. They are to be monthly. Hopefully the July UpDate will be to
Nougat 7.1.2.
Well now, we have a "fresh" system again. There were some warnings that you couldn't mix SuperSU and
Magisk so now all of SuperSU
is gone and all root is gone. So is
TWRP . And I need
TWRP to install
Magisk . -BUT- before jumping in with both feet we will wiggle our toes
and check out how this will work with the Next OTA. I definately have 'root' gone and have the 'stock' recovery and bootloader. Need to figure out how to save
this stuff so's maybe I won't have to do another RUU.
Well, I got
Magisk installed and I am rooted -BUT- don't ask me how. NO, I did not get the stock bootloader and recovery saved. I stumbled through all this twice
or thrice and got it working. Or at least it seems that way. I have 'root' again and it is supposed to be such that I can get an OTA. Think there are some modules
that I have to get to make that possible -but- this is a beginning.!!
Magisk version 13.1 and Magisk Manager version 5.0.4 (
July 10th, 2017/11:07pm)
Updated--
Magisk version 13.2 and Magisk Manager version 5.0.6 (
July 14th, 2017/11:07pm)
Refer:
Droid Views
and
noopener noreferrer
Doing Root MySelf When I sent this off to get it UnLocked I had him root and S-Off it also.
After this UpDate it is still UnLocked and S-Off -but- not rooted. (this color equals computer)
- First make sure you have Devloper Options enabled -and- have USB debugging!!
1. From the Home screen, tap > Settings > About.
2. Tap Software information > More.
3. Tap Build number 7 times or more until you see the message: You are now a developer.
4. Return to the settings and you will find Developer options as one of the choices.
- adb devices
- adb reboot download
- fastboot devices
- fastboot flash recovery /windows/G/HTCM10/twrp-3.0.2-6-pme.img
target reported max download size of 800000000 bytes
sending 'recovery' (21992 KB)...
OKAY [ 1.862s]
writing 'recovery'...
(bootloader) HOSD CL#774095
(bootloader) start@1
(bootloader) recovery@100%
(bootloader) Update partition OK
(bootloader) end@Done
OKAY [ 2.692s]
finished. total time: 4.554s
- fastboot reboot-bootloader
Scroll down on phone to reboot to recovery
Back in TWRP select Advanced.
Select adb sideload
Don't do the wipes but swipe to start Sideload.
Go back to the 'puter.
- adb devices
List of devices attached
HT65T0101066 sideload
- adb sideload /windows/G/HTCM10/UPDATE-SuperSU-v2.76-20160630161323.zip
Total xfer: 1.57x
- ReBoot the Phone System.
- You are now rooted.
Refer: How to Root the HTC 10 and Install TWRP Recovery
Flashfire Allllllrighty now... installed this and I
can't use it. Why??? Cause I can't find where the OTA downloaded to. So far all the places 'suggested' on the Web have NOT produced the file.
As mentioned above, I had to do a Factory Reset before I could do the RUU in order to get the phone in a state that would accept the OTA.
I will try this again later. I will, like with my ReZound
learn this a little at a time. They were both $600 phones and I am trying to not risk screwing it up. Don't know IF I will go the CyanogenMod
route yet or not.
Sunshine Site
Do we really need S-off
Bootloader Unlock
For the security of your phone or as they like to put it many modern smartphone comes with locked bootloader that
means the boot partition of your phone is locked and thus we can not tinker with it but as android is open source and
anyone can make changes to it this would violate GNU licence and hence manufacturers often give a way to unlock your
bootloader with the expense of your warranty.
When you have unlocked your bootloader you basically have unlocked
the capability to overwrite the boot partition of your phone thereby letting you install custom o.s or custom roms on
your phone.
Rooting
Rooting in linux means gaining access to the part of the phone that you don't have normally have access this
includes access at hardware level as well as software level. A very crude translation would be comparing this to the
administrator mode of an Windows PC.
Since rooting requires you to change some part of code in the boot partition
you have to have an unlocked bootloader to root your phone. You have to root your phone after unlocking your phone's
bootloader as unlocking doesn't root your phone but rather gives you the ability to do this. Do remember that unlocking
your bootloader would wipe out your entire device.
Cellphone UnlockingThis is entirely different for the
above two it means to unlock your phone's so that it can be used on different carrier and with a different sim. You can
achieve this unlock by simply requesting sim unlock from your mobile career without rooting or unlocking your bootloader.
Rooting and all would not likely to provide you this kind of unlock on modern smartphones however in past people were
able to unlock their carrier by using some kinds of hack but now it is very difficult to achieve.
Refer:
Difference between three types of unlocking on Android smartphone?
-and-
Un-Locking and rooting Guide
Comments...

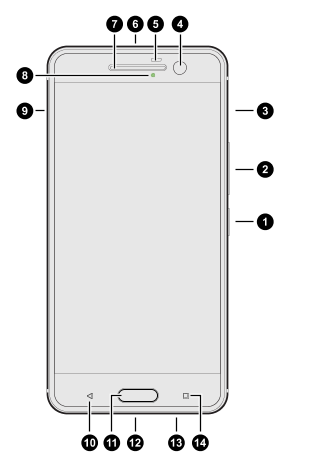
![]() HTC-M9GSM-GM
HTC-M10-32GB-SLV
HTC Support
HTC-M9GSM-GM
HTC-M10-32GB-SLV
HTC Support


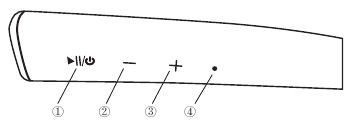
 1 Multifunction Button
2 Volume - / Previous Track Button
3 Volume + / Next Track Button
4 LED Indicator


 Popular
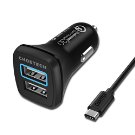
Quick Charge
3
.0 Compatible Devices
